Tuesday 28 December 2010

Christmas offerings

Here is a selection of the cards I sent this year.

 
Tri shutter santa card - Kanban topper and backgrounds


HOTP background paper, topper from Hobbycraft, Silver greeting and embossed panel created with the Cuttlebug.


Tri shutter bauble card. Made with a bought gift tag. Background papers by Craft Creations.

Toppers by Hobbycraft, embossed greetings and embossed panels by Cuttlebug, background papers by HOTP and Artylicious, Snowflake punch by Martha Stewart


New England cottage stamp and Silent Night text by Elusive images, snowflake embossing by Cuttlebug, Distress Inks in Broken China, corner punch by Anna Griffin, tiny gems by Glitterati

Background paper free download from GlendaWaterworth.com

Embossed background by Cuttlebug, poinsettia die cut by Marianne Createables, angel stamp by Elusive Images

Poinsettia die cuts by Marianne, punched fern leaves by L-Em

Holly flourish stamp by Stampendous


Noel stamp by Stamps Away

Cottage stamp by Elusive Images, background Sketchy Flourishes by Inkadinkado, colouring Distress Inks in Scattered Straw and Broken China


Colouring Distress Inks in Vintage Photo and various green markers for the trees


Gorjuss


I like the Gorjuss designs but don't really go for colouring stamps so have avoided buying the stamps. When I saw the Gorjuss designs in die cut packs I decided that was my chance to use the designs on some cards. I have also been looking for opportunities to use the fantastic  DCWV Mariposa papers. They are so scrummy that I couldn't see how I could make a card to live up to them. This is my attempt to combine the two. I hope it works. The Gorjuss girl is a tag die cut which I have slotted into the design on the paper, curling the flower to fit over the tag. The fibres on the left hold a tiny gold key.  The 21 is stamped onto an oval cut with a Nestie. The photo below shows the card closed with the Papermania embellishment on the back edge. The strong sunshine sadly is casting very long shadows which look a bit weird on the card.

While I wasn't looking


This is one of those cards that made itself while I was in bed one night. I had a card all planned out for my friend Judith but I had also been playing with these Viva stencils. When I'd finished experimenting I left a green and purple version out on my workspace overnight. In the morning it had talked itself into becoming Judith's card. I wanted to redo it in creams and pinks though. I used Distress Inks (in Vintage Photo and Victorian Velvet I think) to sponge through the stencil. The same inks also make a frame around the flourish
The flowers were punched from basic Grey paper which had been inked and stamped with a text stamp. I then shaped them and applied gems and pearls to the centres.


The background of the card has been stamped and clear embossed with Inkadinkado's Sketchy Flourishes. The sentiment is by Hobby Art.

Monday 27 December 2010

Coming up trumps

I have been crafting - honest! I need to do a few catch up posts to get up to date. This one goes back to the end of November when I needed a birthday card for Peter. He is a fan of playing card tricks but also collects playing cards and finds them quite inspiring artistically. His final piece for his A level Graphics was a huge playing card. So choosing this project for him wasn't a huge stretch of the imagination. I made it at a time when I was wanting to experiment with stepper cards. I had also just acquired Sir Tim's gorgeous Baroque die and was desperate to use it. So this is what Peter opened on his birthday.


The cards and background paper are by Kanban. The corner punch is by Anna Griffin. The King is mounted on the red satin card Baroque die cut. The card is so luxurious and you can see it better in this photo.


I felt a bit of a cheat using die cuts but I was pleased with the result and felt I'd improved my skills by working with very tiny margins in measuring the layers for the different sections. 

Monday 1 November 2010

Spookylicious!


I loved the stamps in the Elusive Images Halloween collection this year and have been looking forward to having a play with them for some time. Today I got some play time and realised my time was running out to make something spooky in time for this year. I've been wanting to make something for Peter to display in his room at university. When I read Lynn Robinson Hunter's tag tutorial in this month's Graphicus Guild newsletter it all started to come together.

Lynn's tag is actually a Christmas one with a flower, chipboard flourishes and the new Tim Holtz Facets. But what I really wanted to try for myself was her lovely background. I love the way she had used Distress Inks over an embossed design then stamped over the top. Lynn also has a real talent for combining DI colours that I wouldn't think of putting together.

I followed Lynn's tutorial quite closely at first, using a giant tag as she had done. She stamped a flourish in Brilliance Moonlight White which I didn't have so I used Versamagic Cloud White instead and stamped a bat flourish from Inkadinkado's Halloween Trails. I embossed this with clear embossing powder then applied Antique Linen DI with Cut n Dry over the top. I was a bit discouraged to find my flourishes were barely visible. But I had also planned to use Dusty Concord and, as I had hoped, that picked out the bat flourishes really well. I also just caught the edges of the tag with Black Soot for a little extra definition.

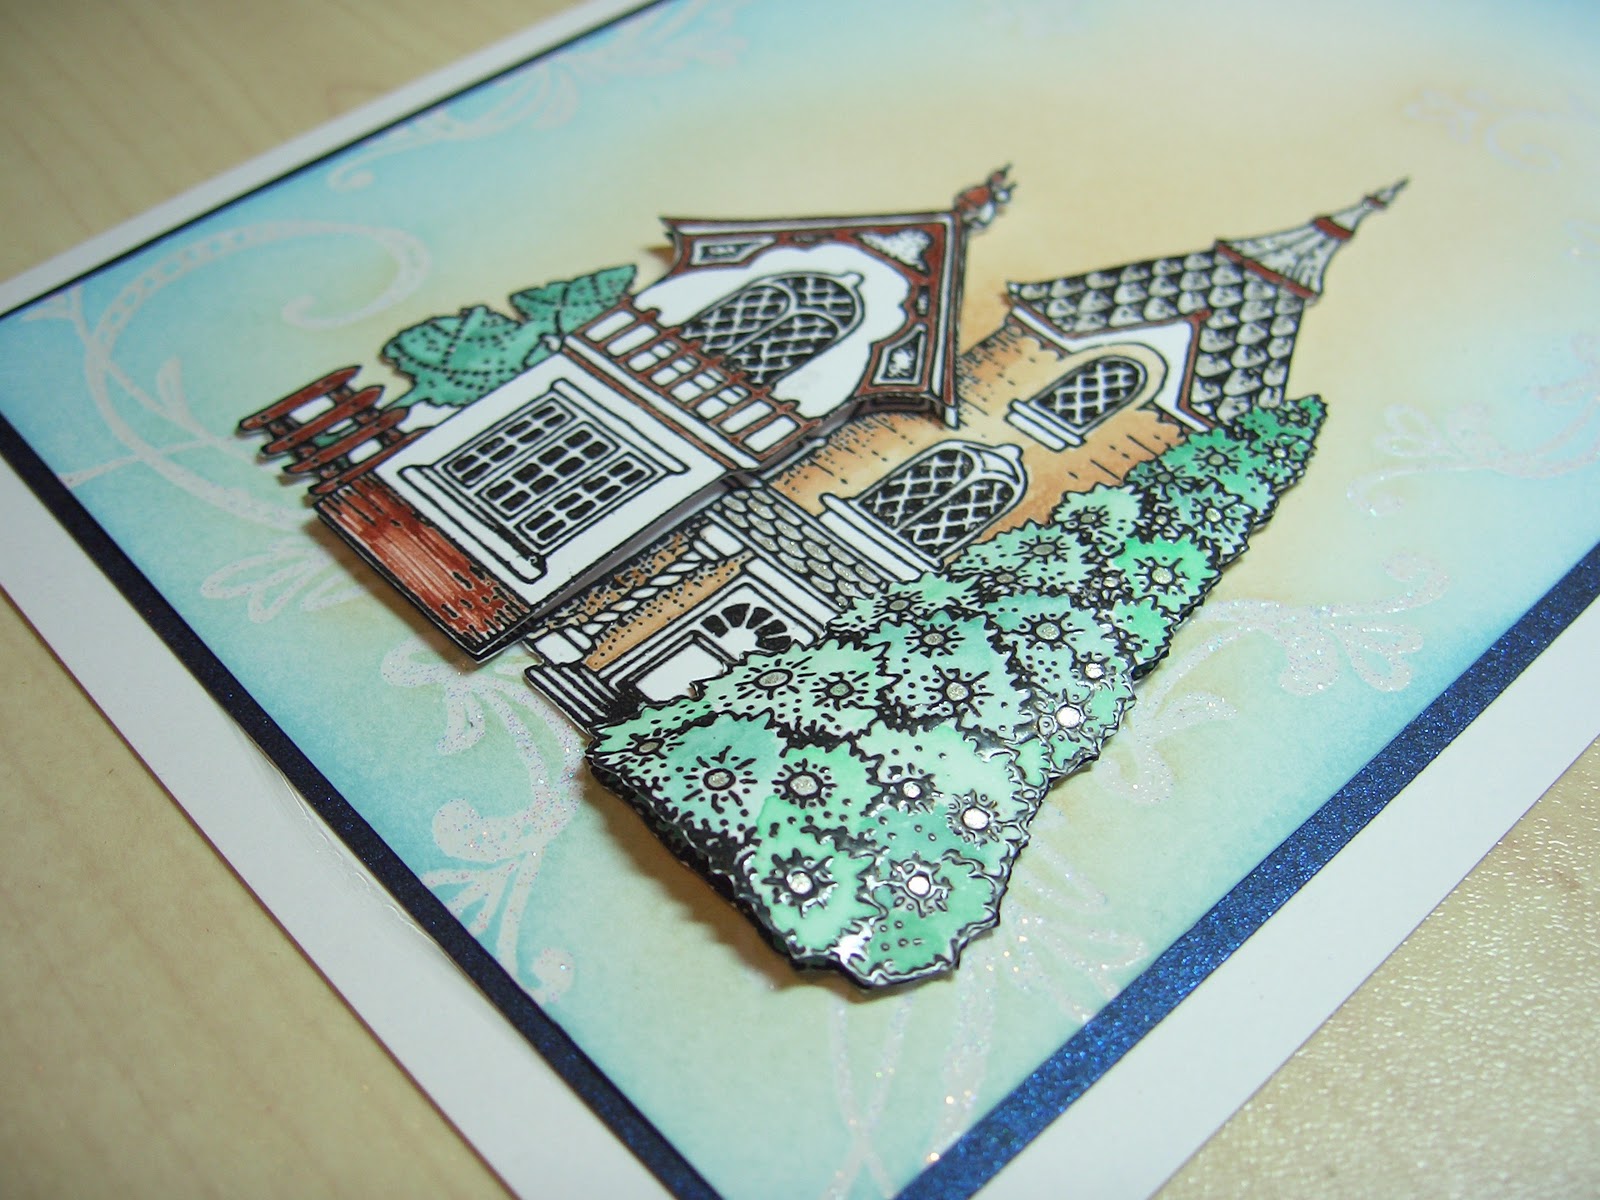
The text is the Viva stamp Lynn used and is stamped in Versafine Vintage Sepia. The house (from Elusive Images' Spookylicious plate) was stamped three times on plain white card and lightly watercoloured using Dusty Concord and Antique Linen again. The roofs were clear embossed although that isn't really visible in the picture above. I curved the top two layers slightly to shape the house. The moon was coloured with a clear Stardust pen and is quite silvery in the light although it looks quite dull in the photo.


I had a few ideas for adding embellishments and  some wording but I was already quite pleased with the way the tag looked and the glue was still wet when Pete had to leave so I found a perfect deep purple satin ribbon and left it at that.

I really enjoyed making this tag and was glad I took a photo before it Peter took it away. I feel inclined to make some more spooky houses even though Halloween is over now. I am even thinking of ways I could use Lynn's design for backgrounds on my Christmas cards and, as luck would have it, Elusive images have made a Christmas cottage stamp in a similar style to this spooky house. And yes, you guessed it, I have that stamp already!

Monday 25 October 2010

Rose resist


I recently picked up this fabulous rose stamp by Darkroom Door. My local craft warehouse were selling it at an irresistable price. On the way back from the shop I already had lots of ideas of what I wanted to do with it. This is the first technique I have tried with it. I started with glossy card and dipped it into Distress Ink (Victorian Velvet?) which had been spritzed with water on my craft mat. After drying it I stamped the rose stamp in Versamark and then brayered ink over the top (can't remember which ink I used but I'm guessing it's Aged Mahogany as it's always the one I reach for first). I then chopped up the glossy card into squares and mounted them onto black pearl card. The white card layer is stamped with Field of Sky (I'm so predictable) and a floral stamp from the Brocade Backgrounds plate by Elusive Images. The text is from Elusive Images' Birthday Words.

Just writing this has given me another idea of what I'd like to try with the stamp. I can see it is going to be very versatile.

Thursday 16 September 2010

Memories of sand and surf

It has been quiet around here lately and when I think back over the last couple of months, I haven't managed much crafting at all, in spite of a six week break from work. There has been no lack of inspiration though. Quite the contrary. My visits abroad have given me a wealth of ideas to follow up but when I found myself with a couple of free hours today my priority was to finish this project. Earlier this year I was delighted to be invited to spend some time with my crafting friend Elaine. Together we are half of Craft Stamping Quartet. Elaine has the most fantastic craft studio set in her own personal woodland. It really is like something from a folk tale. She also lives in the most idyllic location, not far from crashing waves but with red squirrels popping up on the window ledge and wild rabbits hopping into the garden to tentatively take food from our hands. What better place to inspire me? We had planned in advance to each create a sea canvas. We had planned them separately but also had some resources to share. Amazing that we created such totally different pieces.

I painted my canvas with Adirondack Dabbers and then prepared two Grungeboard flourishes as my 'surf'. I can't remember how many layers they needed before I got the effect I wanted but there are various paints on there and also stamped texture, white embossing and Stickles.

The main focus of my canvas was to be a miniture reproduction of a 'collage' created by my sister. Karen is a real artist and creates the most amazing mixed media land/seascapes. I did ask her permission to use the picture, of course and I think she was curious as to what I intended to do with it. I've put the picture in a Memory Frame and added a ball chain.

Another important feature is the glass bottle. This came with no cork so I stole an idea from our Quartet buddy Lesley and made my own out of rolled up Grungepaper. I had planned to use a spiral of paper to suggest a shell but it looked too unusual on a seascape so I trimmed it level.

Inside the bottle is sand from Freshwater Bay which Elaine and I collected when I visited.

It will always remind me of my magical time with her. Until the sand went into the bottle today I had been carrying it around in a little sealed bag in my handbag, along with the little lollipop stick we had used as a spade. Each time I glanced into my bag it made me smile to remember that lovely sunny day by the sea. I felt sad at the thought that there was going to be an empty space in my bag now so I have saved the rest of the sand and put it back. I just need to keep an eye on it and make sure it doesn't split or I will have a handbag full of sand. Weird souvenir huh?

The little file folder is stamped both inside and out with a B Line Lighthouse diagram stamp I really love and had wanted for ages.

I finally need to credit the very talented Penny Bearcroft. When I was first crafting I came across a wonderful sea canvas she had made in Craft Stamper. It has stuck in my mind ever since and I hoped one day I might have the skills to make something similar. Well, this is not as similar as I intended but I have used her inspiration to make something that has become very special to me for all its associations.

Monday 26 July 2010

We're celebrating


Tuesday is our Silver Wedding anniversary. I don't always make cards for hubby as he hasn't fully convinced me he appreciates them but we won't have another Silver Wedding so I thought I should take the opportunity this year. I knew from the start that I wanted to use a piece of pearly card embossed in my Cuttlebug. I also wanted a sprinkling of silver embossing round the edge (here using A Stamp in the Hand's Field of Sky). The 25 was not quite what I had in mind. And it was quite late on that I thought I might use this stunning Elusive Images chandelier as a 'watermark' behind the number. But it didn't want to stay in the background and I decided it was a suitable image for a man's card so I let it take centre stage. The stripy card is Kanban Mono Christmas Stripes Background. The die cut and embossed border is made using a Marianne D Creatable die with a silver ribbon threaded through.

I often forget to take photos of what I make and when I do is is often a rushed afterthought. I really ought to put some effort into getting some decent pictures for the blog. It doesn't help that I often find myself taking photos at silly times of the day. I must work on my photography techniques so I can do justice to my cards.

Tuesday 15 June 2010

Switching channels

It's been quiet on here for a while but that doesn't mean I haven't been busy. In case you've missed my other blog here's a little glimpse of the canvas I made for last month's Quartet project (full post is here).


The canvas project turned out to be more challenging than we could have imagined and the set of four is not yet complete. That means that the latest choice of project has not yet been announced. Can you keep a secret? Here's a clue.


And here's a sneak peek we might not have time to show on the Quartet blog.


If you want to see how it all comes together watch out on Craft Stamping Quartet towards the end of the month.

Wednesday 7 April 2010

Prickles and Stickles


It's not often I'm attracted to cute stamps. I like to see cards made with them (and receive them of course) but I just think other people do them so much better. But I was knocked out by the work of Bev Rochester when I discovered it at the end of last year and so when my heart was stolen by 'Tiny Wishes' by Penny Black, I decided to give this look a try. Sorry the photos are not good and it was very hard to get a shot of the card in a closed position. The shape is an offset gatefold. The papers are Papermania Rose Garden. On the short side the paper is striped. I threaded a fine ribbon through eyelets and then pushed a small rose and rosebud through the bow. The hedgehog has been watercoloured with Distress Inks and a little stickles add to his prickles. Inside I've added some Sizzlits scroll corners for interest. I thought I'd made a real mistake when I edged the papers with Worn Lipstick. It really was the wrong shade for the paper. But once I'd done both paper pieces for the front and edged the pink oval, it all came together. So I've learned how you can actually change the colours of things and get away with it. This will make me much bolder with my colour choices in future. I don't yet have a punch for the leaves that would have set this off so I used some punched scrolls that were given to me by my crafting fairy godmother. Yes, Lesley, I do mean you!

Sunday 28 February 2010

Shabby rose

After seeing the pictures of Elaine's stash for our current Quartet Challenge, I felt inclined to work on something a little more 'loved up' than is my usual style.

I used image transfers of roses and collaged sheet music along with pieces of newspaper to create a background for something I haven't quite decided on yet. At that point I came across Rachel's tutorial for a shabby rose. She had made the loveliest newspaper roses and I decided I just had to have a go. This was the result of my efforts. If you look carefully you'll see the petals are made from the lonely hearts columns! Rachel had edged her original roses with glitter but I thought that would be too heavy for the newspaper ones so I just ran a Stardust pen round the edges of the petals. It doesn't seem to have caught the light in this picture.


The flower was really easy to make and I'm already thinking of variations I want to have a go at. Whether that background will ever see the light of day is another matter.

Thursday 21 January 2010

Me and my big ideas

New year, good intentions....but maybe a step too far. My resolution this year was to use the fantastic Craft Stamper magazine as a bit of a teacher and attempt to do every project in it as a learning exercise. I thought this would take me out of my comfort zone and get me playing with different products. I wanted to keep 'interpretation' to a minimum and use that discipline to widen my horizons.


This is my first effort and exposed how bad I am at some very basic techniques. A beginners' class with Susie Jefferson at Blade Rubber last weekend will hopefully have helped. Sadly, I have got no further with my challenge yet. I counted how many projects I would have to manage in a month and had got to 80 based on last month's issue!!!! Even for a New Year's Resolution that is too tall an order. I'm a once-a-month girl on current form. My crafting buddies, Lesley, Elaine and Judith thought the basic idea was worth running with and are joining in but we have changed the brief. We are now going to choose one project from every issue of the magazine and each produce our own version (interpretation most definitely allowed this time). Not content with just sharing the photos with each other, we are planning on posting them on a new dedicated blog which you can find here. The deadline for the first finished projects is not until the end of February so please be patient. But in between times, we are going to show sneak peeks, products and new finds we are planning to use and possibly some techniques that we pick up along the way.

You have probably reached this page via one of my buddies' blogs but I would urge you to visit all three as I am lucky to be crafting alongside some very talented ladies. We met in the virtual world as admirers of Elusive Images stamps and Graphicus guru Glenda Waterworth but we try to get together in the real world when we can.

Please join us on our blogging journey. It should be a pleasant amble.