Wednesday 30 December 2009

Just caught last post!

I can't believe I left my Christmas cards so late this year. I'm never what you'd call organised but somehow this year I couldn't get my head round Christmas cards until I was faced with last posting dates! I'd made a small handful at the beginning of the season but these were pretty much experimental.

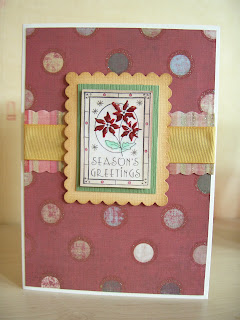
The two cards below made use of a great pack of Kars paper I found reduced at the NEC. In each case I added a stamped panel made using the Inkadinkado Holiday Greetings I blogged earlier and an embossed section cut from Papermania card blanks.


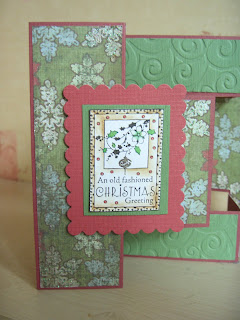
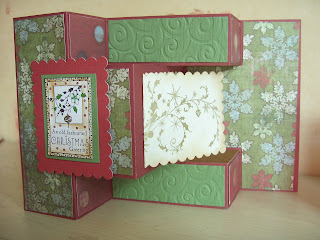
This card used the Kars papers again and a greeting from Inkadinkado Christmas Silhouettes. It's not easy to see in the photo but the printed paper is quite glittery.

This card was made for the Graphicus Guild Christmas card swap and went to Veronica. You can see the card she made for the swap here on her blog. It's well worth a visit.


This card was probably the one I was most pleased with. It uses a Stampavie stamp called Bear and Robin. I coloured the stamped image with Distress Inks and added some Flower Soft to the bear's hat. I'd planned a more elaborate card but when I put the image against this gorgeous paper I really didn't think any more embellishments could improve it so I left it alone.


This card was a last minute cheat. But this year I've been able to justify cheating. I can't resist gorgeous papers and card like this Hunkydory pack. So I may as well use them and why detract from them by adding stamping or too many extras? A ribbon and die cut greeting were all this needed. I know the card doesn't have much of my work in it but I was still very pleased with it.


And finally a card that owes everything to Bev Rochester. I saw some of her silver grey cards at the NEC and just had to have the stamp and eventually the backing papers too. I was going to stamp a full page or more of these beautiful Whiff of Joy 'Lizzie' images. But time ran away with me and this particular stamping was the first and only one I got done. I decided maybe it would have looked better on a smaller card but all the same, I was pleased to have got such good results with my first attempt.


Tuesday 22 December 2009

And my big boy is no longer a teenager


Yes, it's true. 20 years old now. That makes me feel so old! I made him this card with the Inkadinkado Rock Star stamps. First time out of the packet and they stamped beautifully. I really like the stripe stamp too. It's Hero Arts Holiday Stripes and I used it with my stamp positioner to make sure the stripes lined up!

Saturday 28 November 2009

My baby turns 18


Yup. No more children in my house. My youngest son turned 18 yesterday. This is the card I made for him. I chose an architecture theme because this is the subject he plans to study at university next year.

The background is a piece of 12x12 K&Co Life's Journey Architecture Studies. The left hand panel is a piece of card covered in crumpled tissue painted with three colours of Moonglow ink and highlighted with Distress Inks. The main image is an Illuminata stamp by Inkadinkado which I found in a box of clearance stamps at Ally Pally. There are three Stampbord 'spotlights' mounted on the image and the Architecture quote is from Beeswax stamps. The fibres are by Sara books and came with the key, which he'd seen when I bought them and already decided he wanted.

Sunday 1 November 2009

More Christmas cards

I'm really enjoying these MME papers. This card is another simple layout.


The next card was originally inspired by a card in the Stampington gallery which I fell in love with when I first started crafting. It changed along the way and is now nothing like the card that inspired it. It is an A5 gatefold card. I don't have a good picture of the front as it didn't want to stay closed. But this is one side of the gatefold .


The base card is brown and I have scuffed the edges with gold ink. The inside looks like this.

Wednesday 28 October 2009

Making a start on Christmas

I fell in love with these Inkadinkado stamps (a clear set called "Holiday Greetings") the first time I saw them. It was an impulse purchase quite out of character for me. But the more I use them the more I love them and I'm beginning to see how versatile they are going to be. In fact, I can imagine being able to do my whole 2009 card quota with these 6 stamps. Which would be a shame as I bought several other Inkadinkado sets very close to Christmas last year and never got to use them.

My starting point was a blog post from Stamp Talk with Tosh. I love the way she'd coloured the images and attempted to do something similar. I stamped a sheet of images and enjoyed working on them in front of the tv, using Distress Inks, the odd marker, 'puffy colours' (a dimensional medium with a glossy finish which Elaine kindly brought back for me from her European trip and which I used on the poinsettias) and my trusty Clear Stardust pen. You can just see the sparkle in the images at the top of the sheet. I was really pleased that I seemed to get a nice balance between subtle and glam.


I managed to find the gorgeous Signature Christmas papers from My Mind's Eye to use with them and split the pack with my crafty friend Lesley. My first card was very simple but I thought the stamps needed very little to show them at their best.


By accident I found that once mounted, the images were a nice size to go on my tri shutter card so that became my second card.
I decided to make the panel for the handwritten greeting into a little card-within-a-card and to stamp with an image from Winter Trails which co ordinates with the design on the front.


A third card is almost finished but needs a final touch. I feel I'm on a bit of a roll so maybe I'll find the missing piece for my card this evening.

Saturday 19 September 2009

For Elaine


This was a card I sent to my crafting buddy Elaine who has just had a birthday. You may be able to tell from the photo that the gates are embossed onto acetate and are slightly bowed across the card. The plan was to have them open separately and lead to the inside of the card gatefold style. But I wanted them to have a bit of life so I scored them at the 'post' so they didn't lie too flat. But when I offered them up to the card to measure the fixing points, still in one piece, they formed the bow shape and I liked them that way. Of course the extra depth that created really warranted a box which wasn't part of the original plan. So I put them in a slightly more generous envelope and trusted to luck. Elaine is far too kind to tell me the true state the card arrived in but I fear it didn't look quite like this when it reached her.

The gate stamp is from Beeswax and the vegetation beyond the gate is from the Elusive Images Wild Flower plate. 'Imagine' is from Elusive Images WIGL plate.

Tuesday 25 August 2009

Victorian Washstand Tile


This card was 100% inspired by a Victorian washstand tile. I made it as a challenge to myself when I found myself admiring the tile and then realised I had the stamps to reproduce all the elements. The card consists of a black mirri card background, a cream coloured frame mounted on foam tape and layered geraniums which are behind the frame at the base but 'grow' out over the frame. When I made my first attempt I stamped and embossed the frame and flowers on one piece of card. But I decided it was too flat so this version has a separate frame and two layers of flowers. The original flowers were coloured using Tinkabella inks. I loved the 'glazed' finish of the inks but the colour wasn't quite right. I'm still not entirely happy with the colour but these flowers are quite lustrous. They were painted with two shades of mica watercolours and then I used blended pink and orange Tinkabellas over the top. The tile had a butterfly in the top right corner and I was ready to stamp mine but then decided it was the perfect place for a greeting so I used a peel off instead.

The card blank was part of a mixed pack and is high gloss. I'm not sure I've seen anything like it for cardmaking before.

All stamps are by Elusive Images.


Wednesday 19 August 2009

Strawberry season


I bought this little board crate full of strawberries a couple of months ago. I have to be honest and admit the crate appealed to me even more than the strawberries did. It slots together like those balsa wood model kits you can buy. So I took it apart, stamped and embossed on what had been the inside and put it back together inside out. The brown colour is original. In places it was slightly darker, almost as though it had been lightly scorched. So I touched it up with Distress Ink to enhance the effect. I'm really pleased with it because, for once, it actually turned out just the way I wanted it. I'd told myself if I messed it up I'd just have to force myself to eat another kilo of strawberries. But I haven't seen these since so it's as well I got it right first time.


In the photo it is modelling with ink pads but that's just so the pictures of the strawberries (now on the inside) don't detract from the design. I can't decide how to decorate the inside. I was going to do it with papers but I'd need to seal it as I want it to be robust enough to be of practical use to me.

Wednesday 12 August 2009

On the receiving end

I've discovered something even nicer than sending a handmade card and that is receiving one. I was lucky enough this year to receive cards from two talented ladies. As fellow members of the Graphicus Guild we share similar tastes so these friends knew exactly what I would appreciate. The first card was from Elaine, who has kindly agreed to me putting a picture of her card on here. The photo doesn't do the card justice. It's a luxurious black velvet card with not one but two stunning chandeliers. Each is highlighted with jewelled flames. Gorgeous!

The second card was from my crafting kindred spirit Lesley in her very distinctive style. I was going to post a picture here but Lesley has put it on her own blog so why not go there and pay her a visit. Again, the picture doesn't do justice to Lesley's subtle shading. She has built up the image using masks and stamps in both background and foreground. The swooping bird is deliciously pearly.

I feel so lucky to have these cards on my mantelpiece and, more importantly, to have made friends of these clever and generous crafters.

Tuesday 28 July 2009

Dry spell


Dry spell? Not outside the window I know, but here on my blog it's been very dry. In fact I struggled to remember where to find the 'New Post' button! Time has been the problem. Now I have the time as I've broken up for the summer. But the juices aren't flowing again yet. This card took some time in the making and is modest but hopefully the start of a more productive era. I've used some glittered marble card, panels embossed in my Cuttlebug using the Swiss Dots folder, some flowers and ribbon from my stash and flourishes courtesy of my crafty friend, Lesley. The image has been glazed with clear embossing powder and I was pleased to see that my white souffle and clear stardust pens both show through the glaze, although that might not be obvious from the photo. The card is to congratulate my cousin Matthew and his wife Naomi on the birth of their son, Max.

Tuesday 26 May 2009

New favourite

This is now my favourite stamp in the whole wide stamping world. It is a relatively new stamp and appears on an Elusive Images plate called Brocade Backgrounds which you can see here.


I've been experimenting with it and found it really versatile. The stamped image here, which only uses part of the stamp wasn't the one I liked the best but so far it is the only one I have turned into a card. In the picture above, the flower looks like it has some dirty splodges on it but you can see below that these are gold in the light.

The flower background was made by spritzing gold mica spray over Tattered Rose and Aged Mahogany DI on a craft mat. The flower itself is stamped in Crimson Copper Brilliance and embossed with Holographic EP. The card also uses Holiday Stripes by Hero Arts and Happy Birthday by Hobby Art.
It's nice to have something to post again. I've been waiting for so long for a little playtime. I may be able to do some more tomorrow but I am having a new window put in the kitchen, which is my craft room. Common sense tells me I should use my time to mount some new stamps and sort out some of my crafty chaos but if I get the chance to get inky again I'll be in it up to my elbows.
Thanks for looking.

Sunday 3 May 2009

Return to Venice

I've finally got my trip blogged on my other blog. As a little inducement to visit you might want to feast your eyes on these.


Thursday 2 April 2009

Cheery blooms


I couldn't resist these anemones from the florists last week. Sadly, they didn't last and are now long gone. But I had three days of glory from them.

These should last longer because Mother Nature is taking care of them outdoors. I'm not sure why we put our window boxes at the back rather than the front as I think the neighbours see more of these than we do. Maybe that was why we did it. It maybe detracts from the motorbike parts Matt leaves around the backyard when he's working there.


Isn't this mini tulip delightful?

Saturday 28 March 2009

Bodger comes of age?


This is not the card I set out to make! How often does that happen? I was planning to do something a bit more complicated. The first poppy image I made was much more subtle. It was stamped using coloured markers. I watercoloured it but wasn't hapy with the colour of the seed pods. Then, when I glazed the petals with Diamond Glaze, the colours changed. So I tried something a bit different, stamped in black and clear embossed, and the bolder image demanded a more 'robust' background than the one I'd prepared.

The resulting card is much simpler but what really pleased me about it was that I didn't bodge anything along the way. There were no bits I felt the need to disguise. I even managed to shape the petals in the foreground without destroying the glazed surface (not Diamond Glaze this time but clear embossing powder). I'd like to think maybe I've turned a corner but I suspect it's just a fluke and I will be bodging again before long.

Friday 20 February 2009

Where did that come from?


Another one of those cards that sneaks up on you while you're doing something else. It is actually quite shimmery but you can't really tell in the poor lighting. Sorry about the shadows (and the wacky wavy angles). Silly time of day to be stamping, let alone taking pictures!

Thursday 19 February 2009

Simple card


I've been playing today and have some bits in the pipeline. But I wanted something to show for my time at the end of the day so I put this together. I might put some words on that printed paper. Should I...shouldn't I?

Saturday 14 February 2009

Valentine's extra

I got some lovely lilies for Valentine's Day today (thanks, Mirek). They were wrapped in delicious purple cellophane. I've often kept the cellophane from flowers (sometimes paper too) but never really used it. This reminded me of some of the exotic fusible film you can buy so I couldn't resist turning my heat gun on it to see what happened. I felt I had nothing to lose. First I just used the gun on it, shrinking it and then stretching it while it was still warm to keep it flattish (ouch). Then I threw on some Cosmic Shimmer Pink Mallow embossing powder. That looked quite nice. But I thought I'd see if I could get it flat enough to stick on paper so I ironed it through a piece of kitchen paper. Although I did it embossed side down it still stuck to the paper a little. Finally I sprayed it with Crafty Notions gold mica spray. I like the result but not sure what to do with it. This piece is about 2 1/2" square and has not kept its uniform shape. I might try a piece a bit bigger although I suspect that would be even harder to control under the heat.


Both of the pictures are of the same piece on my craft mat (left) and then against white paper.


Sunday 8 February 2009

Spread the Word

At the home of all things lovely - Elusive Images - there are two brand new rubber stamp plates, Butterfly Daisy Collage and Butterfly Poppy Collage ready for release and the very generous Glenda Waterworth is offering these as blog candy on the Elusive Images Design Team Blog. Why don't you pop along there and leave a comment to be in with a chance of winning? On Tuesday 10th Glenda will be demonstrating these stamps on the Create and Craft channel. You know you're going to want them really badly. So get in quick and try your hand now or follow the crowds on Tuesday. Good luck!

Saturday 24 January 2009

Hubby's birthday

I've suffered a terrible lethargy since Christmas. It always seems to happen. The Christmas machine is in top gear and you start to realise what you could achieve if you could keep the momentum going when the season is over. Of course you can't do it. I don't have a lot of special dates at this time of year so nothing else was competing for my attention when I started this. It is for my husband's birthday next week.


If you saw my ribbon collection blogpost you may recognise that I've actually managed to use one of them. This is what the inside looks like. The greeting is inside the black inner card.


If you look closely at the detail you'll see I've cut the small diamonds slightly crooked as I know it all adds to the 'charm' expected of a handmade card! The large diamond on the front serves to hold the inner black card closed.


The damask leaves and diamonds are all from the Elusive Images Filigree Fusion stamp plate. The cream card has been embossed in Detail Gold EP and the bronze and gold card has been embossed in Moonglow Midnight Gold Obsidian EP. The black card has been embossed with the Cuttlebug Swiss Dots folder but you can't really see that in the photo.

Sunday 4 January 2009

In case you were wondering...

...and in answer to Phree's query...

I didn't actually get those lilies and sea hollies arranged but I did bring them onto the dining table to replace the roses. Here they're just standing on the floor so that the background doesn't spoil the picture.


Unfortunately I haven't managed to trim the stamens off quickly enough each day so the pollen has stained the flowers a bit. I bought them on Christmas Eve and today I've trimmed off the first faded blooms. New ones are still coming out every day. Not bad going huh?

Friday 2 January 2009

Still rollin'


This card was based on one I had bookmarked as 'inspiration' and randomly drawn out of the hat when deciding what to play with today. You can see the original by Lynda Benden here. I started by choosing my colours but couldn't decide what colour card I should use for the main oval image. I had to edit the pic to get rid of the slightly green tint on the oval as it is actually pale gold pearlescent card. Unfortunately the editing has made the pink card look more intense than in the flesh which is a shame. I wasn't sure about the gold with the pink and burgundy at all until I stamped part of my image on an offcut of the card, trying to find the right ink. I was blown away by the Brilliance Cosmic Copper. I was really convinced I didn't have any Brilliance inks as I keep this little one with my Versamagic Dewdrops. I was triply(?) thrilled because it looked just as good defining the edge of the embossed background and and also printing the greeting on top of the Cuttlebug embossing. I felt so cheeky even trying it. I'd already printed the greeting on an unembossed piece of card to use as Lynda had. But as my greeting is bigger it didn't balance very well with the raised oval. I think this works better as it doesn't detract from the oval image. Since I took the photo I have added some pink gemstones like Lynda's.

I'm pleased with the card but wouldn't make these in batches for Christmas because of the time taken trying to line up three layers of stamping. It has worked pretty much but the reindeer almost looks like he is running downhill, which wasn't part of the plan.

First Christmas card of 2009

Nothing like starting early!

Last year I couldn't wait to make something that wasn't a Christmas card as soon as the season was over. This year I still have so many Christmas stamps and materials I didn't get the time to use that my engine is still running. So I thought I'd make a few cards and put them away for next year.

I've been intrigued recently by all the good results that have been achieved by using browns and blues together. Lynn Robinson-Hunter is a real master of this. So when I decided my blue card needed a touch of colour round the edges I took a deep breath and followed her lead.


The flourish greeting and background flourishes are from Inkadinkado's Winter Trails. The Snowflake and star are from Elusive Images' Angel and Trees. You might just be able to make out in the photo a couple of touches of the clear Stardust pen. Oh, and the ink used for edging is Antique Linen Distress.